Over time I am going to be detailing some of my favorite applications/settings on a wide variety of Sonimus plugins. I figure what better way to start than the plugin that first introduced me to Sonimus, SonEQ Pro.
Combining the best aspects of a passive, inductor-based tube EQ with the best aspects of a parametric, solid-state EQ, it really opens up a handful of applications not offered by either on their own.
Today I want to go over how I regularly use SonEQ Pro on 2 of my go-to Pultec applications, and two of the most important tracks in the entire mix… bass and kick. Covering one of my favorite (and one of the most famous) Pultec techniques, the boost + cut trick.
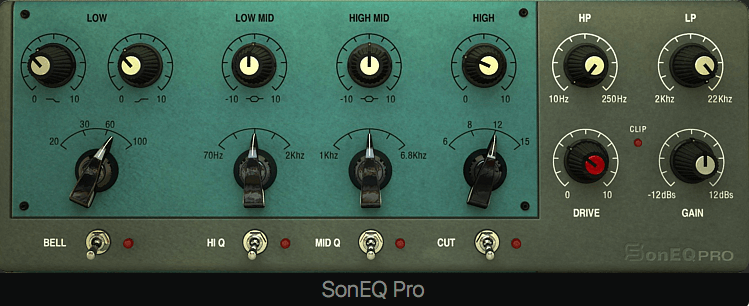
The boost + cut trick is made possible by some unique features and frequency bands/responses that make up a Pultec EQP-1A (and other EQP models), and resonance caused by them interacting. The low band allows you to pick a single frequency but presents a separate knob to boost, and a separate knob to cut. The same applies to SonEQ Pro, except instead of having fixed 20Hz, 30Hz, 60Hz, and 100Hz options; SonEQ Pro is fully parametric (on every band). Back to the original EQPs, this was intended for use one at a time, either boosting or cutting as needed.
What was later found out though (much like the 1176 “all buttons in” mode being accidentally discovered), is that the low-end shelves that make up the boost and cut on the low band don’t perfectly match, meaning that boosting and cutting at the same time affects adjacent frequencies, opposed to having the exact same center frequency and simple cancelling out. So when you select your low band settings (in my case typically 60Hz or 100Hz with a hardware Pultec), you get a simultaneous tightening and fattening effect around that area.
This is particularly fantastic on low-frequency heavy source material, such as bass guitar, synth bass/808 bass, and kick drums, but also tracks that often need thickened up like vocals or certain keyboards.
The resonant peak created by these two interacting bands rarely results in any added “mud” as well, often removing the worry that this enhancement will lead to drowning out other elements of your mix. But the limited frequency options can sometimes step on your toes when using the hardware, or software closely emulating the hardware.
Depending on if I want the kick or bass to be the deeper, more low-end heavy foundation of the song, I’ll start by boosting and cutting 60Hz by 2-5dB, sometimes more as this effect counteracts things from being as blatant as just a normal boost of the same amount with a different EQ. Then I set the opposite track that I want to sit above it at 100Hz, and repeat the process. 60Hz adds more of a round, foundational, heavy low-end boost, while 100Hz is more in the range of the lower punch of a kick drum, or definition of a bass, and adds comparatively more presence.
100Hz is also what I choose most often on vocals with this type of equalizer, since much lower and you are boosting undesirable, rumble-y parts of the vocal. Because I typically find the 20Hz and 30Hz options to be so low that boosting them causes more harm than good in most situations (unless I’m strictly cutting in that range) 60Hz and 100Hz have until recently been my only options to choose from.
No matter where the fundamentals of these tracks truly sit, whether that’s at 40Hz or 68Hz, I’ve had to apply 60Hz or 100Hz and hope it sounds the way I want it to… only occasionally having an excuse to try 20Hz or 30Hz. This was until SonEQ Pro and its parametric bands were brought to my attention.
The SonEQ Pro gives you EVERY frequency between 20Hz and 100Hz, meaning I can perfectly dime in this trick wherever it’s truly needed. The added flexibility this offers cannot be overstated, as not only can I perfectly enhance the low end based on the actual drum’s, instrument’s, or vocal’s frequency response and fundamentals, but I can ensure the low-end material isn’t fighting with each other.
Plus instead of having to use a Pultec-style EQ followed by a more surgical, parametric EQ, I can regularly combine the tasks of both with a single instance of SonEQ Pro. Not only that, but if I want a cleaner result, without the enhancement from the tube saturation effecting the lows, transient response, and air in the upper frequencies, I can simply dial back the gain-independent drive knob on SonEQ Pro.
This pairs perfectly with the increase in frequency options, and can tonally sit anywhere between a 50s/60s Pultec and a much crisper GML-type solid-state EQ often used on stereo buses, mix buses, and while mastering.
There is a simply way to approach this increase in options without inducing “analysis paralysis” as well. Start with boosting by an amount that you find unmistakable noticeable, whether that’s +5dB, +8dB, etc, so you can get a clear idea of how the track is being altered.
Then do a quick sweep back and forth between 20Hz and 100Hz, making more and more minute movements until you arrive on the frequency that sounds best to you. From here, you can match the cut knob to where the boost knob is, dialing things back till you are achieving the desired result without it being overly blatant.
Don’t feel restricted to perfectly match the boost and cut knobs though, great results can be achieved by boosting 4dB, and only cutting 2 or 3dB for example. At this point, about half the time I use this technique I don’t end up perfectly matching them. Sweeping the frequency knob back and forth while cutting by a blatant amount is a great way to find exactly where to add normal subtractive EQ too, which SonEQ Pro also excels at. So play around with it till you find what works best for the song, and as always let your ears pass final judgment on the results.
This is just one band that SonEQ Pro has, of the 4 offered plus the filter section (which is great, since normally plugins like this sell the filter section as a separate plugin). After I set up the boost + cut trick on vocals, I can then proceed to adding presence with the low mid or mid bands, high-frequency air with the high band, or remove any mud that may have made its way into the recording with the filter section (again, all of which fully parametric). Or if I want a bass or kick track that lives solely in the low end, I can use the upper bands to reduce the higher frequencies, or vice versa if I want, say, more pick definition from a bass guitar.
The options here truly are astronomical, and they lend themselves extremely well to experimentation. Next time you want to enhance a track that has a lot of low-end material, whether it’s a grand piano or an 808 kick, try setting your frequency to 45Hz, or 90Hz, etc, instead of the tried and true frequency options that we are normally limited to with this type of processor. I believe you’ll be pleasantly surprised with the results, and you should also have an easier time of getting your kick and bass to play well together versus the alternatives.


Hey! Gear list as in on my website? My designer/programmer, marketing agent, and I are in the process of completely revamping my site and migrating it from WordPress to another website builder and changing the programming language it uses, which has taken quite a while. For example I no longer use heavily modified Yamaha HS8s, but Amphion Two18s and a Amp500, so there is plenty that still needs updated, let alone all the software.
A lot of this is due to a large series of renovations/upgrades I’m working on at my facility, which when completed will have taken a number of months to finish, and will be the largest batch of studio upgrades I’ve completed at one time thus far. I’ll be detailing all of these as they are finished, it’s been a long time in the making!
Sonimus will certainly be heavily featured on my new site once it is completed, and I will be linking all of my Sonimus related articles there with the articles written for other publications as well. In the meantime, I have several Sonimus write ups on my Instagram page, and will continue posting full length articles on here. If you ever have any specific questions until then, please feel free to reach out and I will do my best to answer them.
Best,
Michael Frasinelli
Pleasant article, but it would be nice to see Sonimus listed in the author’s studio’s
gear list……