Finding the right balance in a mix is a game of decision-making. No two mixes are the same, what might work for one song could ruin another. That’s why we have to listen carefully, pay attention to what are the most essential elements of the production, and position them correctly within the frequency spectrum in order to achieve the perfect balance and avoid any masking issues that may occur.
But how do we know we’re making the right decisions when balancing our song? It makes sense to focus on the ‘right areas’ when EQing — but how do we identify these? And is it really possible to EQ ‘by numbers,’ or are there ‘magical curves’ or plugins that will solve all our problems for us? Let’s start from the beginning!
Getting it Right at the Source
The sound captured for each element in a mix has a specific sonic footprint. It can vary by location, microphone, preamp, digital converter and most importantly — the performer and instrument itself. Thinking about how we record each instrument can make the mix-down afterwards easier. Considering what elements will cover the low, mid, and high frequencies and choosing their sound carefully can help you balance the song right from the writing point.
In the past, it all came down to which studio you chose (or could afford) to record your music in, however modern music technology has made it easier than ever for anyone to record anywhere. This is thanks to more affordable mobile recording rigs, modelling microphones, gear emulation plugins and even virtual instruments, all of which allow you to create fantastic and high quality music with nothing more than a laptop.
Clean the Rumble
Only some things produce low frequencies. In fact, for most instruments, filtering the low end with high pass filters will improve their clarity. The question is, how much should I filter? The answer: it depends. Unless we are talking about basses, kick drums, floor toms, bass synths, or any element carrying low-frequency information essential for the body of the song, filtering anything below 80 Hz is a safe move. This will ensure that any rumble or vibration noise that happens during the recording gets cleaned out, however certain elements can go way beyond that. If you are still determining how much you can filter an instrument, try using a low pass filter instead and start going down the frequency spectrum until you can’t hear the instrument. That would be the filtering point. With practice, you will immediately know how far you can take your filtering, clean the low end, and not lose the body of your sound.
Having said that, in some cases you should take the filtering even further to locate the sound of those instruments in a higher frequency range and leave space for other elements to fill the body of the song. Just make sure that those elements exist, otherwise everything will start sounding too thin.
The Mud
We hear this term a lot when we talk about mixing. ‘Mud’ refers mainly to any frequency that reduces the clarity of our sound. Many of these get cleaned up using the above-mentioned high pass filters, but low-mid frequencies can cause muddiness or boxiness depending on the instrument. In this case, using bandpass filters can help with these. By scooping out information in this range of frequencies from basses or bass drums, we can leave space for other instruments like guitars to fill up that space in the mix.
Everything has High End
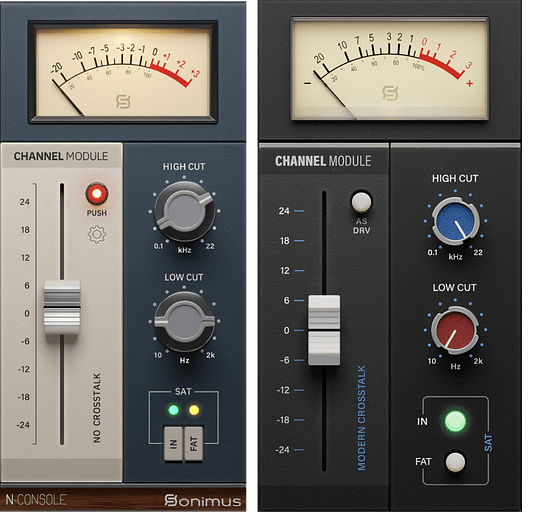
From kick drums, bass amps, pianos, vocals, reverbs or delays, everything has high-frequency components that can be enhanced even further using harmonic distortion. That’s why in most cases, rather than using very steep low-pass filters, it is better to use shelving filters to either cut or elevate the sound of our instruments. Musical low pass filters like the ones found in N-Console or A-Console are also perfect for taming the high frequencies of any instrument without being aggressive. Using these types of EQ, we can add excitement to the mix and make things less harsh to our ears, while retaining this information.
Ultimately, it is all about creating pockets in the frequency spectrum where each element can live without clashing with each other. The idea is to cover the whole frequency spectrum with the elements available in our song and prioritise the most important ones above others. For example, if we have vocals in our song, these will likely be the most crucial element. That’s why it would be recommended to carve out the high-mid frequencies in other instruments competing for the same space so the legibility of the words is clearer.
Musical EQs
Some semi-parametric EQs, like Burnley 73, are called musical equalisers and are regularly used to get a balanced and consistent mix. They provide EQ bands with set frequencies related to musical notes. That’s why they are usually delightful to use.
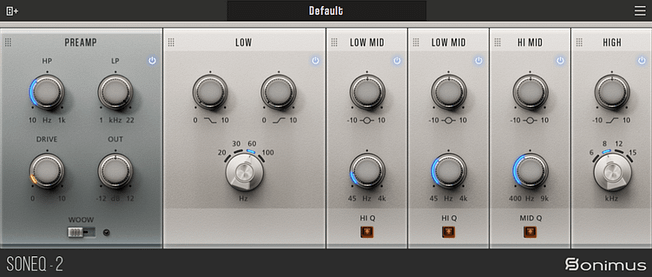
Fully parametric equalisers can take this concept further and create custom EQs for specific musical notes. This way, we can equalise each element of the song in the context of its key and control the notes and harmonics resonating on each instrument. We can create these types of EQs by using Equalisers like SonEQ 2. Set as many bands as you need to frequencies related to a specific note, and you are good to go. For example, A basic EQ in A could have 60, 110, 440, 1320, and 8800 Hz bands. Then save it as a preset for any song tuned to that key.
You probably figured out by now that there are a few specific rules on balancing a mix. It’s all about your thoughts and plans for the song’s sound, the relative importance between its elements, and compensating for each EQ move you make. Finally, having reference tracks to compare your mixes’ balance with will help you identify any missing issues.
If you enjoyed this article and want to learn more about mixing, subscribe to our newsletter or follow us on social media to get the latest news about Sonimus products.


Leave A Comment
You must be logged in to post a comment.