 Are you looking to add depth and dimension to your audio projects?
The Mid/Side recording technique might be just what you need! In our previous blog post, we discussed how to process stereo tracks using Mid/Side, but did you know that you can achieve the same effect whilst recording?
In this article, we’ll explain how to set up and use Mid/Side recording to unlock your creativity.
Understanding Mid-Side
First, let’s understand what Mid/Side is: it’s a stereo microphone technique that captures two separate audio signals from an audio source — the center and the sides. These two components represent different aspects of the sound and can create unique effects during mixing and post-production.
Microphone Set-up
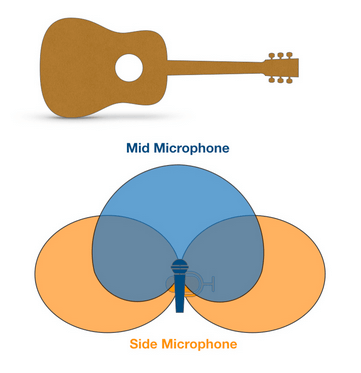
Like any other stereo recording, you’ll need two microphones to set up a Mid/Side configuration: one for the center signal and another for the side signal. The center microphone will face the source, capturing the direct sound (Mid), while the side microphone will be placed at a 90-degree angle to the center microphone to capture the ambience and reverb. Compared to other stereo techniques, for Mid/Side we’ll need microphones with different polar patterns. The center microphone will be cardioid, while the side microphone will be a figure-8 (bidirectional) microphone.
Signal Routing
Both signals must be combined using a particular routing in a mixing console or a DAW to achieve this stereo effect. You can record the two microphone signals independently and then apply this process afterwards in your DAW’s mixer.
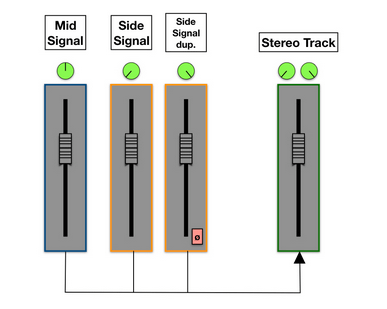
The mid signal contains information common to both the left and right channels. It represents everything located in the center of the stereo field, which is why it needs to be panned center. The side signal contains different audio information between the stereo’s left and right side channels — it represents the spatial aspects of the audio source. To obtain this difference, we would need to route the side signal to two independent channels, pan each hard left and right and flip the polarity on one. This will separate the left and right audio content captured by the bidirectional microphone into their own channel. It is important to note that while these two duplicates are panned to opposite sides, they must be kept at the same volume. That’s why grouping them or creating a VCA in your DAW might be interesting to have simultaneous control over their faders.
Finally, the effect will be complete by combining these three channels in a stereo track.
Mid-Side Processing Techniques
Once you’ve recorded your audio using the Mid/Side technique, you will have precise control over the stereo width of your audio. By changing the levels of the center signal or the sides, you can widen or narrow the stereo image to fit the mix perfectly, creating a sense of space and depth. You can also apply independent EQ and compression to the mid and side channels and enhance the stereo-imaging of your track.
Why not experiment with Mid/Side recording in your next session. Be bold and push the boundaries of creativity, try it to widen your acoustic guitar sound for example. With practice and careful attention to detail, you’ll discover how this technique can elevate your audio productions to new heights, adding depth and dimension that will captivate your listener’s ears.
If you enjoyed this article and want to learn more about mixing, subscribe to our newsletter or follow us on social media to get the latest news about Sonimus products.


Leave A Comment
You must be logged in to post a comment.