Drums are an essential part of a song. They deliver the rhythm, energy and punch of the record; but at the same time, they have many different elements. They are very dynamic and cover the whole frequency spectrum range. That’s why they are so difficult to mix and create a faithful representation of their performance in a record.
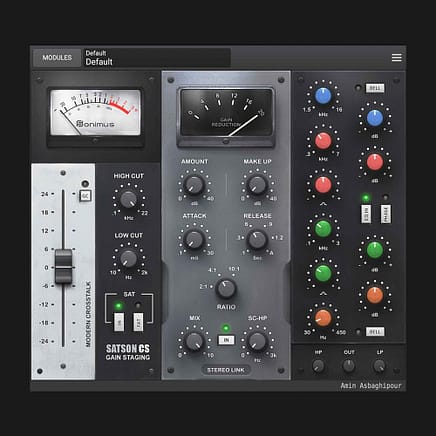
Combining EQs and compressors can make the mixing job more manageable, but sometimes stacking up plugins in your DAW can be challenging to manage. Channel strips can make your life easier since you have everything you need in one place. Add the possibility to create complex compression and EQ chains without leaving the plugin, and you get the perfect mixing tool. We are, of course, talking about Satson CS.
In this article, we want to give you some tips on how to get the most out of your Drums using nothing but Satson CS. Let’s dive in!
First Things First
One of the first things we must do when mixing drums is ensuring we have enough headroom and are not overloading each track. To do this, we need to gain stage for each element of the drums using the preamp module of Satson CS. Setting up the metre calibration at -26dBFS and aiming for the needle to move around zero while adjusting the fader will ensure the correct level across the track. Also, consider applying a high pass filter to each element of the drums to remove rumble and make things sound clearer. Try cutting everything below 30 Hz from the bass drum while going up to 80 or 100 Hz for toms and overheads. If you are using the overheads as cymbal mics, feel free to go higher than that to isolate the frequency spectrum of the cymbals, but be careful to make them thick enough.
Comp-EQ or EQ-Comp?
The eternal question: should I compress or EQ first? There is no right or wrong answer to this. It would depend on the performance, dynamics and sound of your drums. The great thing is that thanks to Satson CS’ modularity, you can try both just by dragging the EQ or compressor module before the other — it’s that simple!
If getting the sound tighter and more controlled is necessary, consider compressing first. A slow attack, a medium released with a 4:1 ratio, would ensure the transients go through while the compressor evens the sound. Getting around 4 or 5 abs of gain reduction in the louder bits should do the trick. This technique can be beneficial for the bass drum or snare. Then you can add the EQ module to get the tone you are looking for out of the drums.
On the other hand, EQing the overheads first and then compressing them to make the cymbals more sustained can make your drums shine. In this case, using the EQ module first, carve out some of the boxiness around 450 Hz while pushing the high end from 4kHz onwards with the high shelf band. Then, with the compressor module set at a medium to fast attack and fast release, reshape the envelope of the overheads so you get more of the shimmer of the cymbals while controlling the dynamic of the transient.
Consider Bus processing
An excellent strategy to get a good-sounding drum kit fast is to focus on processing the drums instead of tweaking each channel. After gain staging, cleaning, and balancing your drum tracks, send them all to a summing bus and add Satson CS as your central plugin. On top of your regular EQ and compression steps, you can add saturation to excite your drums by engaging the gain compensation switch in the preamp module. Now, increase the fader level until you get the attitude and grit you want from the drums. It will help them cut through the mix better. Also, if you are compressing the whole drum kit, consider using the side chain filter of the compressor so the compressor doesn’t get triggered by the low frequencies constantly. Otherwise, the drums would sound thinner than what you had in mind.
How do you process your drums? Do you use Satson CS to make them cut through the mix? Let us know in the comments below, and remember to subscribe to our newsletter to get all the news, tutorials and articles directly in your inbox.


Leave A Comment
You must be logged in to post a comment.