One of the most beloved products under Sonimus’ hood is Tuco — a versatile and great sounding vari-mu style compressor. We covered what vari-mu compressors are and how they work in previous articles, but to help you understand what Tuco brings to the table, we need to unpack all of its features to help you get the most out of your sessions.
Find your Mode
The first things we need to look at are the 4 compression modes available in Tuco. Similarly to other well known program-dependent compressors, the plug-in provides different attack time and ratio combinations to choose from. Mode 1 and Mode 2 correspond to slow and fast attack compression, while Mode 3 and Mode 4 have the same attack times from the previous modes but with higher ratios (limiter) — so when should we choose each of them?
Attack Times
The slow or fast attack times settings correspond to 10 msec and 1 msec respectively. This allows Tuco to either keep the transients in the audio signal, or grab the whole signal to have full control over its volume. Slow attack settings can be very helpful to keep the punch on your bass drum or snare, while fast attack can be used on cymbals, bass guitars or vocals to even out their performance.
Ratios
Vari-mu compressors reduce the gain of the material gradually as the signal gets closer to the threshold value. The ratio of the compressor also increases as the signal gets louder over this same threshold. In the case of Tuco, the threshold level changes with the Amount knob. As we turn the Amount clockwise, we will see how the needle in our gain reduction metre starts moving.
Although the ratio varies as the signal overpasses the threshold value, Tuco can be set to work more gently or more aggressively using either its compressor or limiter mode. The maximum gain reduction ratio when compressing will be 3:1. On the other hand, this value will change to 10:1 when switching the plug-in to limiter.
Choosing between compressor or limiter mode will depend on how dynamic our audio source is and how much presence we would like to obtain from it. Use compressor mode if you want subtle gain reduction over your track, or limiter mode if you don’t want any volume change to pass unaffected by Tuco.
Stereo treatment
A great feature sometimes overlooked are the different stereo settings. While some compressors only offer mono or stereo modes and rely on the host DAW to control its behaviour, Tuco allows its users to change the way it processes both channels on a stereo track. You can choose between Mono, Stereo Vintage, Stereo Modern or Dual Mono.
- Mono: Processes a stereo input through mono unit compressor.
- Stereo Vintage: Feeds the sum of both channels (left & right) into a single unit detector circuit, then applies the same “gain reduction” to each channel.
- Stereo Modern: Each channel (left & right) is processed independently. Combines the two gain-reduced channels into one, resulting in equal gain reduction for both sides.
- Dual Mono: Each channel is processed independently by two compressor units.
Mono is meant to be used in mono tracks and your DAW will normally select this mode automatically for this kind of audio material.
When processing stereo signals, Tuco’s behaviour can change the way your track sounds in the stereo field. Most stereo compressor plug-ins will work in a stereo modern approach, where the gain reduction triggered by each channel is applied to both sides. This behaviour generally causes the track to sound more centre focused or mono. Stereo Vintage and Dual mono will sound more open and wide which can be great when used in the master track of your mix or for mastering work.
While having control over the left and right channel settings can be helpful when working in Dual mono, Tuco’s unified controls help to keep a consistent compression for any centred information in our stereo field, while reacting to other discrepancies on each channel independently.
Turning The Knobs
Aside from the classic Output and Release controls, Tuco offers 3 more settings to get the most out of the compressor.
The first one is a must in modern music production: the Mix knob. Who doesn’t love the ability to get more presence and excitement in tracks without touching a fader? The ability to create parallel compression directly within the plug-in is a great feature and Sonimus kept it in mind when designing this compressor. Just dial an aggressive compression in your track, bring your mix all the way to Dry, and start bringing the wet signal until you’re satisfied with the result.
The SC HP screw is a side-chain highpass filter. This control doesn’t EQ the audio signal being compressed, instead it filters the signal being detected by the compressor. This makes sure that the low frequencies in our audio don’t trigger the compressor, which is especially helpful when compressing a full mix. By turning this virtual screw, we leave the low end of our mix unaffected, keeping it punchy and big while adding glue to the rest of the frequency spectrum.
Last but not least is the Drive knob. It provides the Sonimus hallmark warmth and analog sound. Emulating the saturation from a tube stage, it adds character and harmonics to our signal no matter how gentle or aggressive your compression is. You can always add extra flavour using this knob even with no compression at all! Instant mojo at one knob turn.
The Devil Is In The Detail
Finally, there are two hidden features in Tuco (unless you’ve read the manual), both related to the way you can use the Output knob.
One is the Auto Make-Up Gain. As its name suggests, it compensates for any volume drop resulting from compression. To engage it, just click on the “Amount” label of the plug-in and select Auto Makeup Enable. In this scenario the output knob becomes a volume control of the output signal and it doesn’t need to be used for compensating any gain reduction.
To find the other hidden feature you need to click the “Mix” label. Here you can change the position of the Mix knob inside the plug-in chain. If you select Before Output Control, the dry signal is adjusted automatically to match the compressed signal volume. This way the Output knob will affect both signals: wet and dry. This is the default setting and it helps to get a blend of both signals quickly and easily.
If you choose After Output Control, the Output knob will only affect the compressed signal. Very much like a traditional parallel compression, first the compressed signal must be levelled matched with the dry signal using the Output knob (unless Auto Makeup is engaged). Then just use the Mix control to find the right dry/wet ratio.
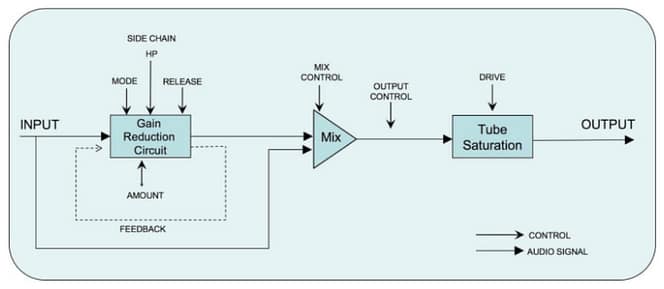
If this explanation is not clear enough, hopefully these two diagrams will clarify the signal flow of the plug-in.
Mix Before Output Control
Mix After Output Control
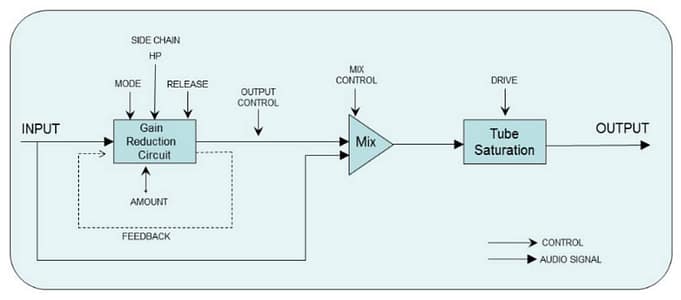
As you can see, Tuco is not your average vari-mu compressor. It’s packed with great features that allow mixing and mastering engineers to shape the sound of their projects in any way they like. Add a collection of great presets and A/B comparison capabilities to the equation and you will understand why Tuco is a must in your plug-in arsenal.
Did you know about everything Tuco has to offer? Do you use any of these features in your mixes? Let us know in the comments and subscribe to our newsletter to find out more about Sonimus plug-ins.


Leave A Comment
You must be logged in to post a comment.